Recent Posts
Prepare and Protect: Expert Storm Season Tips from SERVPRO® of Norman
6/11/2024 (Permalink)
 The scene underscores the destructive power of severe weather and the urgent need for professional restoration services.
As storm season sweeps through Norman, Oklahoma, it’s crucial for residents and business owners to stay vigilant and prepared. The severe weather that often accompanies this time of year can bring a host of challenges, from heavy rains and flooding to damaging winds and hail. At SERVPRO® of Norman, we understand the unique risks our community faces and are committed to providing the expertise and resources needed to weather any storm. Our team of highly trained professionals is on standby 24/7, ready to respond to any storm-related emergency with swift and effective solutions. Whether it's water extraction, structural drying, or full-scale restoration, we have the tools and experience to restore your property to its pre-storm condition.
Preparation is key to minimizing storm damage, and SERVPRO® of Norman encourages everyone to take proactive steps to protect their homes and businesses. Simple measures such as securing outdoor furniture, maintaining clear gutters, and having an emergency plan in place can make a significant difference. Additionally, our comprehensive storm readiness services include thorough inspections and customized preparedness plans tailored to your specific needs. Should the worst happen, remember that SERVPRO® of Norman is just a phone call away. Our goal is to make storm recovery as seamless and stress-free as possible, ensuring that our community remains resilient and safe throughout the storm season.
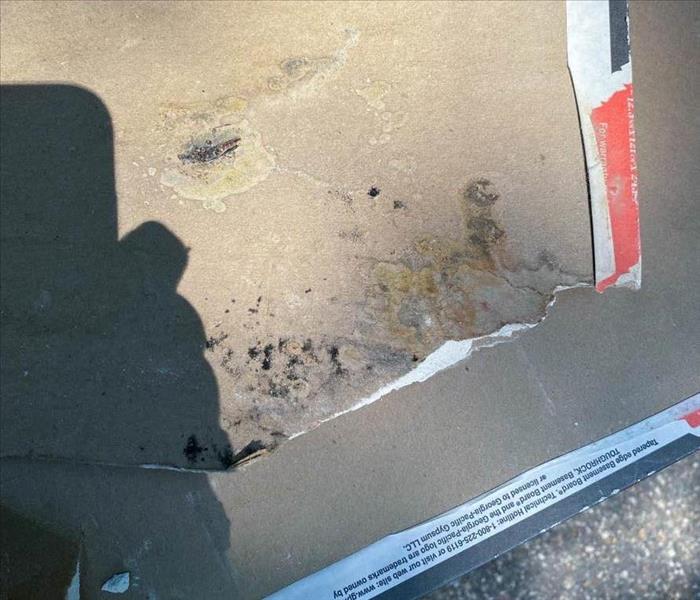
Dealing with Mold: Your Comprehensive Guide to a Healtheir Home
5/22/2024 (Permalink)
 Displaying visible mold growth. Dark patches of mold are scattered across the ceiling, indicating moisture accumulation and poor ventilation.
In every home, there’s a silent intruder that often goes unnoticed until it’s too late: mold. Mold not only affects the aesthetics of your home but also poses serious health risks to you and your family. As a homeowner, understanding mold, its causes, and how to effectively deal with it is crucial for maintaining a safe and healthy living environment. In this guide, we’ll explore everything you need to know about mold in your home and how SERVPRO of Norman can help you tackle this common household problem.
Understanding Mold: Mold is a type of fungus that thrives in damp, humid environments. It reproduces by producing spores that can spread easily through the air. While mold spores are everywhere in the environment, they only become a problem when they find favorable conditions to grow indoors. Common indoor molds include Cladosporium, Penicillium, Alternaria, and Aspergillus, among others.
Causes of Mold Growth: Mold requires moisture, warmth, and organic matter to grow. Common causes of mold growth in homes include:
- Moisture intrusion from leaks in plumbing, roofs, or windows.
- High humidity levels, especially in poorly ventilated areas like bathrooms and basements.
- Flooding or water damage from storms, burst pipes, or appliance malfunctions.
- Condensation on cold surfaces such as windows or walls.
Health Risks of Mold Exposure: Exposure to mold can lead to a variety of health problems, especially for individuals with allergies, asthma, or weakened immune systems. Common symptoms of mold exposure include:
- Nasal congestion
- Sneezing
- Coughing
- Sore throat
- Skin irritation
- Wheezing
- Shortness of breath
- Sinus infections
In severe cases, prolonged exposure to mold can cause respiratory infections and exacerbate existing health conditions.
Dealing with Mold: If you suspect mold growth in your home, it’s essential to take prompt action to prevent further damage and protect your health. Here’s what you can do:
- Identify and address the source of moisture: Repair leaks, improve ventilation, and use dehumidifiers to reduce humidity levels.
- Clean and disinfect affected areas: Use a solution of water and detergent to scrub mold off hard surfaces. For larger infestations, consult a professional mold remediation service like SERVPRO of Norman.
- Dispose of porous materials: Items such as carpets, drywall, and insulation may need to be removed and replaced if heavily contaminated with mold.
- Take preventive measures: Regularly inspect your home for signs of moisture or mold growth. Keep humidity levels below 60% and ensure proper ventilation in all areas of your home.
How SERVPRO® of Norman Can Help: When dealing with mold problems that are too large or difficult to handle on your own, SERVPRO of Norman is here to assist you. Our trained technicians have the expertise and specialized equipment to safely and effectively remediate mold in your home. From initial assessment to thorough cleanup and restoration, we’ll work diligently to ensure your home is mold-free and your family is safe.
Don’t let mold compromise the safety and comfort of your home. By understanding the causes of mold growth, recognizing the signs of infestation, and taking prompt action, you can effectively manage mold problems and create a healthier living environment for you and your loved ones. And when you need professional assistance, SERVPRO® of Norman is just a phone call away, ready to restore your home to its pre-mold condition.
Cleaning techniques for different types of fire damage
4/19/2024 (Permalink)
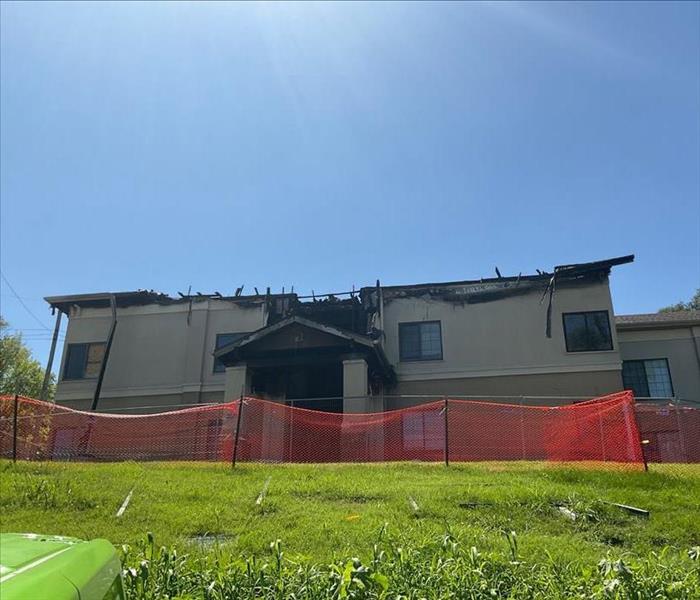 SERVPRO is dedicated to utilizing advanced methods and technologies to provide efficient and effective fire damage restoration services.
At SERVPRO®, we understand that experiencing a fire in your home or business is a traumatic event. Once the flames are extinguished, the road to recovery involves not only rebuilding but also restoring your property to its pre-fire condition. In this blog post, we will discuss essential cleaning techniques for different types of fire damage, providing valuable insights to help you navigate the restoration process effectively.
Assessing the Damage
Before diving into the cleaning process, a thorough assessment of the fire damage is crucial. Different types of fires result in varying residues, such as protein, synthetic, or natural materials. Understanding the nature of the residues is the first step in choosing the appropriate cleaning methods.
Dry Cleaning for Light Residues
For light residues, such as soot from a small kitchen fire, dry cleaning methods can be highly effective. Techniques like dry sponging and vacuuming with HEPA filters help remove loose particles without causing further damage to surfaces.
Wet Cleaning for Moderate to Heavy Residues
Moderate to heavy residues, commonly found in structure fires, require more intensive cleaning methods. Wet cleaning involves using water or cleaning solutions to break down and remove stubborn soot and smoke residues. SERVPRO employs specialized cleaning agents and techniques tailored to the specific type of residue for optimal results.
Ultrasonic Cleaning for Delicate Items
When it comes to restoring delicate items like electronics, jewelry, or intricate decor, ultrasonic cleaning is a game-changer. This method uses high-frequency sound waves to create tiny bubbles that gently lift away contaminants without causing harm to the items.
Thermal Fogging for Odor Removal
Even after visible residues are cleaned, lingering smoke odors can persist. Thermal fogging is a powerful technique that disperses a deodorizing fog to neutralize odors at the molecular level. This method is particularly effective in open spaces and hard-to-reach areas.
Ozone and Hydroxyl Generators for Air Quality
Ensuring indoor air quality is a crucial aspect of fire damage restoration. Ozone and hydroxyl generators are employed to break down and neutralize odorous molecules in the air, promoting a fresh and clean environment.
Navigating the aftermath of a fire can be overwhelming, but with the right cleaning techniques, your property can be restored to its pre-fire state. SERVPRO is dedicated to utilizing advanced methods and technologies to provide efficient and effective fire damage restoration services. If you find yourself facing the aftermath of a fire, trust the experts at SERVPRO to bring your property back to life.
Preserving the Essence of Life: World Water Day with SERVPRO of Norman
3/20/2024 (Permalink)
 SERVPRO® of Norman remains steadfast in its mission to preserve the essence of life by protecting and conserving water, today and every day.
Water, the essence of life, flows through every aspect of our existence. From sustaining ecosystems to nurturing human life, its significance cannot be overstated. As we celebrate World Water Day, it's imperative to reflect on our responsibility to conserve and protect this precious resource. SERVPRO® of Norman stands at the forefront of this endeavor, recognizing the vital role water plays in our community and beyond.
Understanding the Importance of Water: Water is more than just a substance; it's a lifeline. It sustains agriculture, powers industries, and ensures the well-being of all living beings. However, this invaluable resource faces numerous threats, including pollution, scarcity, and climate change. Recognizing these challenges is the first step towards fostering a culture of conservation and sustainability.
SERVPRO of Norman's Commitment: At SERVPRO® of Norman, we understand the significance of water not only in emergencies but also in everyday life. Our commitment extends beyond restoration services; we are dedicated to promoting water conservation and raising awareness about its importance. Through education, community outreach, and sustainable practices, we strive to minimize water wastage and protect our environment.
Empowering Communities: Communities play a pivotal role in safeguarding water resources. By empowering individuals with knowledge and resources, we can collectively work towards a water-secure future. SERVPRO® of Norman actively engages with local schools, businesses, and organizations to instill a sense of responsibility towards water conservation. Together, we can make a tangible difference in preserving this vital resource for future generations.
Taking Action: On this World Water Day, let us pledge to take meaningful action to protect our planet's most precious resource. Whether it's fixing leaks, reducing consumption, or advocating for policy changes, every effort counts. SERVPRO® of Norman encourages everyone to join hands in this endeavor and become stewards of water conservation in their communities.
Mold in Commercial Kitchens: Risks and Solutions
3/13/2024 (Permalink)
As a SERVPRO® professional committed to ensuring the safety and cleanliness of commercial spaces, we understand the unique challenges that mold growth poses in commercial kitchens. Mold jeopardizes the integrity of your kitchen, and can be a real pain to remove. In this blog post, we'll delve into the potential risks associated with mold in commercial kitchens and provide effective solutions to keep your establishment mold-free.
Identifying the Risks
Commercial kitchens, with their high humidity levels, constant use of water, and abundance of organic materials, create an ideal environment for mold to thrive. Mold growth can compromise the structural integrity of your kitchen, damage equipment.
Common Culprits
There can be several contributing factors to your mold problem, here are just a few:
- Leaks and Water Damage: Identify and repair leaks promptly to prevent water damage, a major contributor to mold growth.
- Poor Ventilation: Inadequate ventilation can lead to moisture buildup, creating an environment conducive to mold.
- Improper Cleaning Practices: Neglecting thorough cleaning of kitchen surfaces can allow mold to flourish on food residue and other organic matter.
Preventive Measures
As they say, the best defense is a good offense, there are several preventative measures you can take to ensure the problem doesn’t return, or never even appears in the first place.
- Regular Inspections: Conduct routine inspections to identify and address potential moisture issues before they escalate.
- Proper Ventilation: Ensure your kitchen is well-ventilated to reduce humidity levels and promote a dry environment.
- Prompt Repairs: Fix leaks, damaged seals, and other issues promptly to prevent water damage and mold growth.
- Professional Cleaning: Invest in regular, professional deep cleaning to eliminate hidden mold and prevent its recurrence.
Effective Solutions
Hope is not lost in the face of a mold problem! Here are a few options to remediate your mold issue:
- Mold Remediation Services: In the unfortunate event of mold infestation, seek professional mold remediation services like those offered by SERVPRO®. Our experts use advanced techniques and equipment to eradicate mold and restore your kitchen to a normal condition.
- Educational Training: Train your staff on mold prevention practices, emphasizing the importance of cleanliness, proper ventilation, and prompt reporting of any water leaks.
Maintaining a mold-free commercial kitchen is crucial for the success of your business. By implementing preventive measures, investing in professional services, and educating your staff, you can create a normal environment for everyone. At SERVPRO, we are dedicated to supporting businesses in their mold prevention efforts, ensuring a clean and thriving commercial kitchen. If you have any concerns or require assistance, don't hesitate to reach out to our experienced team.
Water Damage and Home Energy Efficiency: Retrofitting for Savings
2/7/2024 (Permalink)
Water damage not only poses immediate risks to your home but can also impact its energy efficiency. Retrofitting your home after water damage can provide an opportunity to improve energy efficiency, leading to long-term savings. In this blog post, we will explore how to retrofit your home after water damage to enhance energy efficiency.
Insulation Upgrades
Water damage often requires removing and replacing damaged insulation. Take advantage of this opportunity to upgrade insulation in areas such as walls, attics, and crawl spaces. Consider using energy-efficient insulation materials, such as spray foam or cellulose, which offer excellent thermal performance and reduce heat loss or gain in different seasons.
Window and Door Sealing
Water damage can compromise the seal around windows and doors, leading to drafts and energy loss. Replace damaged or deteriorated seals and weatherstripping to improve energy efficiency. Consider upgrading to energy-efficient windows and doors with low-emissivity (low-e) glass and properly sealed frames, providing better insulation and reducing heat transfer.
Efficient HVAC Systems
Water damage can affect heating, ventilation, and air conditioning (HVAC) systems. Replace damaged or outdated HVAC equipment with energy-efficient models. Look for Energy Star-certified systems that meet specific efficiency criteria. Additionally, ensure regular maintenance and cleaning to keep your HVAC system operating optimally, promoting energy efficiency.
LED Lighting
Replace water-damaged light fixtures and bulbs with energy-efficient LED lighting. LED bulbs use significantly less energy than traditional incandescent bulbs and have longer lifespans. Take advantage of retrofit opportunities to install dimmable LED fixtures and motion sensors that save energy by turning off lights when not in use.
Water-Efficient Fixtures
Consider retrofitting water-damaged areas with water-efficient fixtures such as low-flow showerheads, faucets, and toilets. These fixtures reduce water consumption without sacrificing performance. Upgrade to smart irrigation systems that adjust watering schedules based on weather or soil moisture, further optimizing water use outdoors.
Solar Power Integration
Water damage repairs provide an ideal opportunity to consider installing solar panels. Solar power can significantly reduce your dependence on traditional electricity sources and lower energy bills. Consult with professionals to assess the feasibility of solar power integration based on factors such as roof orientation, shading, and local regulations.
Water damage is an unfortunate event, but it can also serve as an opportunity to improve your home's energy efficiency. Retrofitting after water damage allows for insulation upgrades, sealing windows and doors, installing energy-efficient HVAC systems, upgrading to LED lighting, implementing water-efficient fixtures, and considering solar power integration. Embrace these retrofits to enhance energy efficiency and enjoy long-term savings.
Cleanup Tips for Managing Debris and Fallen Trees Post-Storm
1/17/2024 (Permalink)
After the fury of a storm has passed, the daunting task of cleanup and restoration begins. Debris scattered and fallen trees can pose safety hazards and impede the recovery process. At SERVPRO of Norman, we understand the challenges homeowners face in the aftermath of storms. In this blog, we'll discuss effective strategies and safety measures for clearing debris and fallen trees after a storm to help you restore your property safely and efficiently.
Safety First: Assessing the Situation
Before starting cleanup, assess the area for potential hazards like downed power lines, unstable structures, or hidden debris. Safety is key. For large or hazardous debris, seek professional help like SERVPRO®. Our trained experts possess the skills and equipment to handle complex cleanup tasks safely.
Managing Debris Cleanup
- Sorting Debris: Segregate debris into categories like organic (tree branches, leaves) and non-organic (damaged structures, furniture) for efficient disposal.
- Proper Disposal: Follow local regulations for disposing of storm debris. Utilize designated disposal sites or hire waste removal services.
- Protective Gear: Wear appropriate gear such as gloves, boots, and masks to protect against sharp objects or hazardous materials.
Clearing Fallen Trees
Exercise caution when removing fallen trees. Assess the tree's stability and consider hiring professionals for large or precarious trees. Use proper cutting techniques and equipment like chainsaws to safely remove branches and sections of fallen trees. Determine if the tree can be salvaged for lumber or if it needs to be cut into manageable sections for disposal.
How SERVPRO® Can Assist
At SERVPRO of Norman, our team specializes in storm damage restoration, including debris cleanup and tree removal. We're equipped with industry-standard tools and expertise to handle even the most challenging cleanup tasks.
Post-Cleanup Tips
After clearing debris and fallen trees, inspect your property for structural damage or potential issues caused by the storm. Take photographs or videos of the damage for insurance claims. Keep records of expenses related to cleanup and restoration.
Cleaning up debris and fallen trees after a storm is a challenging yet essential task to restore safety and normalcy to your property. Prioritizing safety, employing proper techniques, and seeking professional assistance when needed are crucial steps in the cleanup process.
Remember, SERVPRO of Norman is here to assist you in restoring your property after storm-related damages. Contact us for prompt and reliable storm damage restoration services!
Securing Your Property: Why Building Board Up Is Essential After a Fire Loss
12/20/2023 (Permalink)
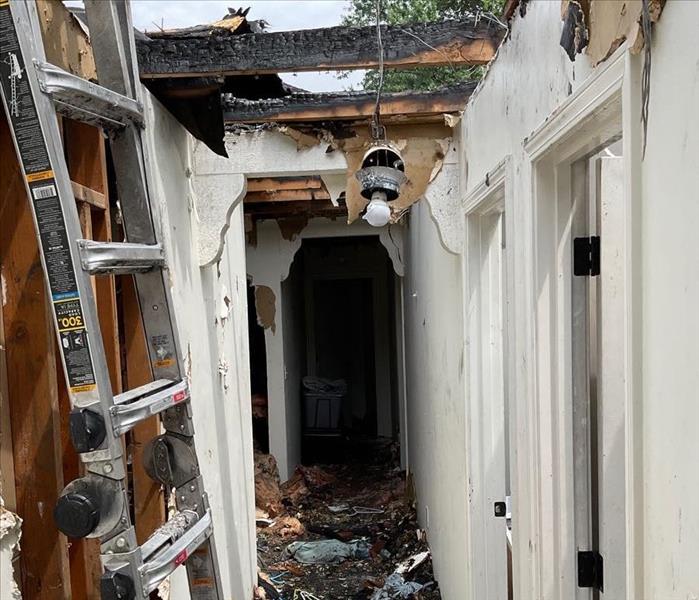 While the immediate focus is on addressing fire damage and restoration, there's a crucial step that's often overlooked: building board-up.
A fire incident is an unexpected and distressing event that can leave your property vulnerable to various risks in its aftermath. While the immediate focus is on addressing fire damage and restoration, there's a crucial step that's often overlooked: building board-up. Below we'll explore the significance of building board-up after a fire loss and how this essential service helps safeguard your property during the recovery process.
1. Enhanced Security
After a fire, your property can be exposed to looting, vandalism, and unauthorized access. Building board-up provides an immediate and effective solution to secure your property. By covering openings such as broken windows and doors with sturdy boards, you deter unwanted visitors and maintain the integrity of your property.
2. Protection from the Elements
Unprotected openings in your property can expose it to the elements, including rain, snow, and wind. These elements can further damage your property, compounding the restoration challenges. Building board-up acts as a protective barrier, preventing environmental factors from causing additional harm and deterioration.
3. Minimizing Liability
Open and damaged structures pose significant safety risks, and you could be held liable if someone is injured while on your property. Building board-up helps mitigate this risk by reducing access to hazardous areas, thereby minimizing potential liabilities.
4. Maintaining Privacy
The aftermath of a fire is a sensitive time for property owners. Building board-up ensures privacy by preventing unauthorized access and keeping prying eyes away. This allows you to navigate the recovery process with the confidentiality and peace of mind you deserve.
5. Preserving Valuables
A fire may have damaged your property, but there may still be salvageable items inside. Building board-up provides an added layer of protection for your valuables by preventing theft and further damage. This allows you to recover and restore items with sentimental or monetary value.
6. Faster Insurance Claims Processing
Most insurance companies require property owners to take reasonable steps to secure and protect their properties after a fire loss. Building board-up demonstrates your commitment to safeguarding your property, which can facilitate a smoother and faster claims processing experience.
7. Comprehensive Restoration
Building board-up is a crucial part of comprehensive fire damage restoration. It sets the stage for a more organized and efficient restoration process by providing a secure and controlled environment for restoration professionals to work. It ensures that the restoration process can begin promptly, addressing structural damage, soot, and smoke damage.
In conclusion, building board-up is not just a practical step; it's a necessity after a fire loss. It enhances security, minimizes risks, and safeguards your property from further damage. Professional building board-up services, such as those offered by SERVPRO® of Norman, ensure that your property is well-protected and sets the foundation for a successful and thorough fire damage restoration process. Prioritizing building board-up is a vital component of your journey toward restoring your property to its pre-fire condition.
Does Renters Insurance Cover Mold Damage Cleanup?
11/20/2023 (Permalink)
 If you ever encounter mold issues in your rental property, don't hesitate to reach out to the SERVPRO® of Norman!
Mold is an issue that can affect any living space, including rental properties. Whether you're currently renting or considering renting a property in Norman, it's essential to understand the role of renters insurance in covering mold damage. In this blog, we'll explore the key aspects of renters insurance and its coverage when it comes to mold damage.
An Overview of Renters Insurance and Mold Damage
Renters insurance is designed to protect tenants from various risks, including property damage and personal liability. While it typically covers perils like fire, theft, and vandalism, it's crucial to know how it relates to mold damage.
The Basics of Mold Damage Coverage
In most cases, standard renters insurance policies do not cover mold damage caused by a peril specifically excluded from the policy. Common exclusions include long-term neglect, poor maintenance, and gradual wear and tear. However, renters insurance may cover mold damage if it is the result of a covered peril, such as a burst pipe or a roof leak.
Direct vs. Indirect Damage
Renter's insurance may cover both direct and indirect mold damage. Direct damage refers to mold growth resulting directly from a covered peril. For example, if a burst pipe causes water damage that leads to mold growth, renters insurance may cover both the water damage and mold remediation. Indirect damage, on the other hand, occurs when mold develops due to the property owner's negligence or failure to address known issues. In such cases, renters insurance may not provide coverage for the mold itself but could cover property damage resulting from the negligence of the property owner.
Limits and Deductibles
Like any insurance policy, renters insurance may have limits and deductibles. Be sure to review your policy carefully to understand the maximum coverage amount and the deductible you would be responsible for in the event of a covered claim.
Prevention and Maintenance
While renters insurance may provide coverage for mold damage under specific circumstances, it's crucial to take proactive steps to prevent mold issues in your rental property. Regularly report any signs of water leaks, dampness, or humidity problems to your landlord or property management. Additionally, maintain good indoor ventilation and cleanliness to minimize the risk of mold growth.
Consultation with Insurance Experts
To fully understand the mold coverage provided by your renter's insurance policy, it's advisable to consult with insurance experts. They can help clarify the specifics of your coverage and provide guidance on any additional endorsements or policies that may offer more comprehensive mold protection.
Renters insurance in Norman, OK, can provide coverage for mold damage under certain circumstances, such as when it results from a covered peril. However, prevention and timely reporting of issues to your landlord or property management are essential in maintaining a safe and mold-free living environment. If you ever encounter mold issues in your rental property, don't hesitate to reach out to the SERVPRO® of Norman experts for professional mold remediation services!
Damage to Expect from Sewage Backups
10/25/2023 (Permalink)
 If you experience a sewage backup, prioritize safety and call professionals immediately.
Sewage backups are more than just an inconvenience – they pose serious risks and can cause extensive damage to your Norman, OK, property. In this blog, we'll explore the potential dangers of sewage backups, the water damage they can cause, and the essential steps for safe and effective cleanup.
Understanding the Risks of Sewage Backups
Sewage backups can introduce harmful bacteria, viruses, and pathogens into your home. Exposure to sewage can lead to various issues, making prompt and proper cleanup crucial.
Assessing the Extent of Damage
Sewage backup water damage can affect not only your floors and walls but also your belongings and even your home's structural integrity. A professional assessment is essential to determine the full scope of the damage.
Hazards and Safety Precautions
Dealing with sewage is dangerous. Always wear appropriate protective gear, including gloves, masks, and eye protection. Avoid direct contact with contaminated water and surfaces.
Water Extraction and Removal
The first step in sewage backup cleanup is removing the contaminated water. Specialized equipment is used to extract and dispose of the sewage safely.
Disinfection and Sanitization
Thorough disinfection and sanitization are critical to kill harmful microorganisms. EPA-approved disinfectants are used to ensure your home is safe.
Mold Prevention
Sewage backups create ideal conditions for mold growth due to the moisture and organic matter present. Mold prevention is a crucial part of the cleanup process.
Structural Drying
After water extraction, drying your property is essential. Proper drying helps prevent further water damage and inhibits mold growth.
Content Cleaning and Restoration
Belongings affected by sewage backups can often be restored with professional cleaning and sanitation. Restoration experts can assess what can be saved.
Air Quality Testing
Air quality testing is recommended to ensure that no harmful airborne contaminants remain in your home after cleanup.
Professional Cleanup Services
Given the risks and complexity of sewage backup cleanup, it's strongly advisable to seek the services of professionals like SERVPRO®. Our trained experts have the equipment and expertise to handle sewage backups safely and effectively.
Sewage backups are a serious threat to your health and property in Norman, OK. If you experience a sewage backup, prioritize safety and call professionals immediately. Remember that the longer sewage water sits, the greater the risk of damage and health issues. SERVPRO® is here to assist you with expert sewage backup cleanup, ensuring your home is safe and restored to its preloss condition.


 24/7 Emergency Service